- in Beauty Tips by tony
Identify Your Face Shape

Choosing flattering hairstyles, make-up, jewelry and glasses is easy when you understand your face shape. Find out what yours is by using this Face Shape Article to help identify your face shape.
More...
There are six basic face shapes - oval, heart, round, long, square and triangle and knowing yours is a vital step in boosting your beauty potential.
When you understand your face shape, you'll be able to choose hairstyles that look great on you, accentuate your best features with clever make-up tricks, and pick the most flattering sunglasses, jewellery and clothing.
- Oval
- HEART
- ROUND
- LONG
- SQUARE
- TRIANGLE


Triangle Shaped Facial features.
Triangle faces have a strong jawline and a narrower forehead
Face reading experts and Chinese astrologers believe that faces reveal subtle clues.
What does it say about triangle face: They are trustworthy, reliable and easy to get on with.
Hairstyles: Triangular shaped faces are angular at the jaw line, but narrow through the forehead.
They can be treated much the same way that square faces are treated, with one exception; more height and fullness is needed throughout the crown and bang areas to make this section of the face appear larger.
Earrings:
Sunglasses: Add width to the upper half of your face with colored frames that have detail at the top
eyeglasses: Short drop earrings and studs add delicate detailing, but avoid angular styles.
Triangle base side down: This face is narrow at the eyes but wider at the jaw. Frames need to accent the eyes and add depth to the upper half of the face, while minimizing the jaw line.
Triangle base side up: Just the opposite of the one above, the face is narrow and angular at the chin but wider across the forehead and eyes.
The idea for frames is to draw the attention to the lower half of the face while softening and minimizing the upper part.
Famous triangle faces include Friends - Jennifer Aniston, Minnie Driver, Jodie Foster, Sandra Bullock, Demi Moore, Elementary- Lucy Liu and Sigourney Weaver.
Keywords: strong jaw, face narrows towards hairline.
Choosing the best glasses and frames.
Who knew that eye wear could make such a difference?
Each of us has a different shape to our face. That shape has to be taken into consideration when we buy eyeglasses. In order to look your best, compare and contrast.
If you wear glasses, choosing the right frame for your face shape can show you in a strong light or just an obscure one.
What Frames Do I Need?
The order of the day is contrast. If you have a square face, you don’t want square glasses.
They will only accentuate the features that you want to minimize or hide.
Since you’ll be wearing glasses all the time, let them help you by creating the illusion of the face that you want.
The focus is on the eyes and you want it to be as favorable as possible.
Let’s look at each facial shape and how to choose the best style of glasses.
What type of face do you have?
Square:
This face has pretty even dimensions all around. The face is just as wide as it is long. There is a strong forehead and an angular jaw.
Your frame choice will soften the angles of the face and give it a rounder look. Soften your proportions with narrow frames in an oval shape.
Choose ones that are wide but on the thinner side depth wise.
Round:
A round face is similar to square except it has no lines - just curves. Because the face is curvy with no definite angular lines.
In order to bring a bit of angle to the face, choose frames that are angular and narrow.
Glasses that have a clear bridge piece gives the illusion of wider set eyes.
Another good shape is rectangular frames.It is actually quite full all over. You want frames that will make the face appear thinner and longer.
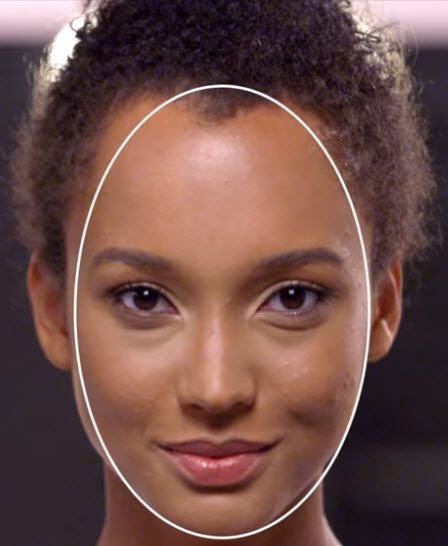
Oval:
This is the desired face shape (if we all had a choice) because the entire face is in balanced proportions.
The ideal frames will not change the perception of those proportions in any way. Choose frames that are no wider than the sides of the face.
Try walnut-shape frames or frames that are in proportion as far as depth and width.
Oblong:
The face is longer than it is wide. The nose may actually be long as well.
The idea for frames is to make the face appear shorter and wider.
To make your face appear shorter, choose a frame that is thicker but not overly wide.
Don’t be afraid to choose a decorative frame that has designs on the temples as well as temples that are different from the color of the frame itself.
Consider frames that have a lower bridge to shorten the look of your nose.
Diamond:
The face is narrow at the forehead and the chin with very high cheek bones. Frame choices will highlight the eyes and soften the angles of the chin, while minimizing the cheek bones.
To soften the cheekbones and play up the eyes and chin, try a throwback fashion – the cat-eye shape.
If you don’t want to look like the school mam, then opt for rimless glasses or frames with a lot of detail work across the top.
Triangle base side down:
This face is narrow at the eyes but wider at the jaw. Frames need to accent the eyes and add depth to the upper half of the face, while minimizing the jaw line.
The idea is to play up the top of the face and give it depth. Add a splash of color to your frames. If you like, choose a cat-eye frame for emphasis.
Triangle base side up:
Just the opposite of the one above, the face is narrow and angular at the chin but wider across the forehead and eyes.
The idea for frames is to draw the attention to the lower half of the face while softening and minimizing the upper part. To downplay the top of the face.
Try rimless glasses or those that are wider at the bottom than the top. Lighter colors can minimize the top of the face.
Here are a few tips about matching the frame to your face. This can save you the trouble of trying on every pair of glasses in the store to find the right one. You can narrow down your choices from the start.
* Choose colors that accent your eyes.
They are the windows to the soul and the focus of your face.
If you have blue eyes, consider a pair of blue frames.
* Choose a size for frames that is appropriate to your face.
Don’t think of the little school boy who has glasses as big as window frames. Proportion is important if you want your eye-wear to accentuate your personality.
* Contrast your frame shape with your facial shape.
Round glasses on a round face just make it look, well, more round.
Frames need to enhance, not detract.
If you have been wearing the wrong type all these years, you’ll be surprised what a difference the right frame makes to your look.
Video: How to figure out your face shape
Video: Identify your face shape to contour
What are contouring and highlighting?
Well, contouring and highlighting is the use of light and dark to help shape, sculpt, and define the face.
Sephora has a wide variety of different products both cream sticks and powders that you can use.
Before you put any product on, I want you guys to start by identifying your face shape.
That's the most important part.
One size does not fit all with contouring.
So how do you figure out what your basic face shapes are?
Let's go over them.
Heart-shaped face: A heart-shaped face tends to have a wider width from temple to temple and tapers down to a more narrow chin.
Let's talk about a round shaped face: A round shaped face tends to be equally distant from forehead to chin, as it is from cheek to cheek.
A square-shaped face: A square shaped face tends to have the same width from temple to temple as it does from jawline to jawline.
Oval shaped faces: So an oval shaped face tends to be one and a half times longer from forehead to chin than it is from cheek to cheek.
Now that you learned how to correctly identify your face shape your next step is to move forward to the video for you to teach you how to contour.
And for deeper skin tones, we've got a video just for you.
.
Video: How to contour your heart shaped face
If you haven't done so already I'm going to recommend going back into the series and watching the video above on identifying your face shape.
It's really important to make sure that this video actually pertains to you.
On a heart-shaped face the widest area is at the temples and the forehead and it's going to narrow down towards the chin.
We've already prepped her so her skin is moisturized and there's a light foundation on her.
It let's me start with a flawless face.
I'm going to be using a cream for my highlighter.
Sephora has powders, creams, sticks, everything you can imagine.
So I'm going to start by highlighting her jaw.
I'm also going to be doing the bridge of her nose.
So, I'm going to have you do your under eye.
So that's going to go right in this zone here.
Yeah, really good.
I'm also going to do the top of the cheek for you, and we're going to do the corners of mouth.
And then I'm going to have you do your forehead right in this zone here,
okay?
There. Yep, perfect.
Now that we've mapped out our highlighting we're gonna move on to the next step, which is the contouring.
Make sure that the choice of color we use is really appropriate for a shadow.
You don't want anything too warm or too orangey.
You wanna make sure it almost has a grayish type of tone to that brown.
Take the brush and I'm going to have you do your contour down your hairline. You also want to come into the temple a little bit.
This is going to help us narrow down the forehead a little bit more. I'm going to pop a little bit under the chin, not too much.
Now for the cheek contouring, what you want to make sure you're doing is following your natural bone structure.
Start at the top part of the ear here and imagine a line going towards the corner on the mouth.
You're just gonna bring a little line there.
You want to try the other side?
Sure.
And we're just going to bring a little bit of the darkness down the side of the nose. And that's our contouring.
So now that we've mapped out are highlighting and contouring areas we're gonna move into the blending process.
This is probably one of the most important steps in here.
We're gonna start by doing little small strokes just to blend out all the area that we applied our product.
You really want to make sure that you don't have any harsh edges in this. It should look really soft and smooth.
And how about you try a little bit right now?
So now we're gonna move on to blending our our contour out.
We're going to start in forehead area and we're going to push this down a little bit blending it in.
When I'm blending through my cheeks I like to often use more of an upward movement.
It gives a softer edge.
And then of course we're going to finish off by blending through our nose contour.
So now that we finished the blending process, the next step is just to finish the whole thing off.
We're going to use a translucent powder.
I'm going to use a press and roll motion. This is gonna help make the product last longer. The next step you might want to do is add a little bit of warmth in here so possibly a blush or bronzer.
But there you have it, that's contouring for a heart-shaped face.
the .

Video: How to contour your oval face
If you haven't already, make sure you go back and watch the video on how to identify your face shape.
I'm here with Victoria and she has an oval face shape.
This face shape is generally balanced, and longer than it is wide So we're going to achieve the contour using light and dark to enhance her features and maintain the balance.
So let's get started.
I've already prepped her skin with moisturizer and foundation and now I'm ready to highlight.
There's a wide variety of Sephora products you can choose from. Sticks, powders, and creams.
Today I'm going to be using creams.
I'm gonna go into my highlighting I'm going to really layer it on.
When you're doing the forehand for an oval face shape you wanna go more upwards and you really want to focus on doing an arch or a half circle, then slide it right down the nose to do the highlight for the nose.
Now I'm going to highlight the base of the chin.
You want to highlight either side of the nose.
And lastly what I like to do is highlight around the outside corners of the mouth.
This is going to create a nice lift.
Also you want to hit the outside of the jaw.
When choosing a contour color you want to make sure it's not too metallic and not too warm.
I recommend choosing something that's in the brown famiy. A little bit more neutral, taupe, just something that can blend easily that's not going to overpower the look.
I'm gonna begin right in through the outside of the cheek.
I'm using the angled side, the tip of the brush.
The next place you're going to contour is the outside of the forehead Give it a shot.
When doing that, that's going to allow her to minimize her hair line but also really enhance her face shape.
Next I'm going to focus on contouring the nose. So now I'm going to do a little bit of contouring on the outside of the jaw.
A little bit here.
So now that we have our highlight down, we have our contour down now it's time to blend.
Start from the inside corner of the eye, blending outward and then going from the darker side inward.
So really, light into dark, dark into light.
Go ahead and blend your other side.
Blending up into the forehead bringing down that contour just so that it looks more air brushed. Go ahead and try the other side.
Now I'm gonna move down into the nose.
Again you want this to look air brushed, you don't want to see any lines.
With this part you can add a little bit more pressure a little bit more rhythmic motion with your tools. And now that we've blended, we can move on to the finishing step.
It's time to finish the look with a translucent setting powder.
So what I'm going to do is start in the center of the face with a light press and roll.
Go ahead and try the other side. Notice that she's not blending or pulling on the brush.
This is really key in making sure the look stays on all day long.
So now that I've shown you some easy tips and tricks on contouring, really make it your own with blush and bronzer for added warmth.
And there you have it - Contouring for an oval shaped face.
.

Video: How to contour your round face
Before we get started, I want you to go back into the first video of our series to identify your perfect face shape.
To determine a round face shape, the length and the width are equal.
We want to make sure we are highlighting the center of the face to elongate and we are contouring the perimeter areas to create a little bit more narrow.
Are you ready?
Let's get started.
So I've already prepped her skin with moisturer and foundation.
There are three different ways you can contour.
You can use powders, creams, or sticks.
I will be using creams today just to show you exact placement.
So we'll take a little bit of highlight, and we're going to highlight right in the center of your forhead as well as down the bridge of your nose, and also your chin.
Would like to try it?
Yes.
Create a little X right in the center of your chin.
Create a nice highlight right under the eye.
We want to make sure we keep it nice and long.
Pop a little bit of a highlight right on top of that cheekbone.
And there you have your highlight placement.
So now for the exciting part, we're going to start into contouring.
This is the part where it's really gonna change the face shape and really narrow down any round edges on her face.
So I will be using a really taupe-y, cool undertone.
You want to stay away from any shimmers or warm colors.
We are going to start right in the area of her ear and we're gonna drag it down and this is really going to slim down any round edges.
Would you like to try it?
Yeah. We want to also contour the temples.
You just want to do a little c-shape, to really narrow down the round edge.
We want to slim down the nose a little bit by contouring and shading the sides.
Just make sure to use the edge of the brush to really give it a nice smooth line.
Pop a little bit right under the nose to give it more of a lifted look.
Now that we have all of her highlight and contour in place, the next step is blending.
So now we want to blend all these lines into place and create a really smooth and seamless finish.
I also like to do rolling motions that really just holds the product in place where you placed it.
Would you like to blend your chin? Keeping the product in place and creating really smooth lines.
So now that we have her highlight all blended, let's start blending all those contours. So, we're gonna just blend all of this into place. Here, try the other side.
So you really want to make sure you contour down that way you really smooth out the jawline and then you can start blending upwards.
There you go and that's really gonna smooth out any harsh lines.
And blending towards the hairline, rolling out to really smooth out that harsh line that I've mapped out.
Blend down the bridge of her nose.
And there you have it, she is all blended.
We want to make sure we set everything into place so nothing moves.
So we're going to grab a little bit of setting powder This is really going to prevent any product from moving.
As you can see, you can contour and define a beautiful face shape in just a few easy steps and don't forget: add a pop of color to your lip and your cheek.
And there you have it - this is how you contour for a round face shape. .

Video: How to contour your square face
If you're not sure of your face shape, I would encourage you to check out the first video in our series to find out which shape is unique to you.
Now Gana here has a square face shape.
You'll notice that her temples, cheekbones and jaw line form straight lines and are equidistant from the center of the face.
Our goal with this particular face shape is to round the perimeter of the face and soften those edges and also some of those angular features.
At Sephora we have a lot of product options for you to choose from when it comes to highlight and contour.
We have creams, sticks, powders.
Today I'm going to use creams.
I've already prepped Gana's skin with moisturizer and a lightweight foundation and we're ready for the second step, which is highlighting.
Starting with a cream product and a small brush we're gonna start in the center of the forehead.
Using the tip of the brush I'm going to pull straight up... and then bounce down to the chin to elongate the face.
To connect the two we'll draw a small line just down the center of the nose.
Another great best practice is to highlight under the eye. Starting right in the tear duct, we're gonna pull down and out.
Now Gana why don't you give it a try.
A great best practice as well, is to apply just to the top of the cheekbone here.
It's nice to apply a little bit of highlight just on the outer corners of the lip.
Now that we'ved lengthened the face with highlight, we're ready to soften the perimeter in the face with contour When choosing a contour shade, it's important that you pick one that's not too orange or one that has too much shimmer.
That will give a really falsified effect on the face.
What we're looking for is a taupe based contour color.
We're gonna drag that product right along the jawline.
Next, scoop right underneath the cheekbone.
Using the tip of the brush I can scoot it right along the sides and down to the tip of the nose.
Ready to try it?
We're gonna scoop underneath the cheekbone and go right along the side of the nose.
So now we're ready for the next step. We're going to blend everything together and soften those lines.
We're going to focus on keeping the points of intensity or the points of light by pressing the product into the skin.
Now I like to start by blending the light first because it'll be a lot easier to blend the dark into the light.
Now you're ready to blend, here you go.
So now we're going to blend the dark onto the light, blending in upward motion.
You ready to try it? With the jawline, take it and blend it down on to the neck. Perfect. So we're ready for our last step which is to finish this off.
We're going to use a little bit of a powder to set the cream contour products we used.
That's going to ensure that it's really durable and it lasts all day.
Starting at the top of the cheekbone, we're gonna roll our brush down onto the face and pat through the rest.
Now Gana are you ready to set it?
So now that you finished the look you can add a little bit more warmth with blush and bronzer, but there you have it - contouring for square shaped face.